
![[Review] MTX Connect eSIM in Japan](/blog/content/images/size/w1200/2019/04/mtx-connect-esim-japan-coverimage.png)
MTX Connect is a Luxembourg based MVNO that provides data services BtoC and BtoB. They offer 3G/LTE mobile data in 100+ countries worldwide. I am going to run you through the process of purchasing an eSIM from the MTX Connect website on my eSIM enabled iPhone XR in Japan.
For this guide, I'm just going to just use my iPhone. This is to prove how simple it is to order one of these bad boys, with just a iPhone and a WiFi connection.
eSIM Purchasing Process
First, go to their website. The website will ask you if you want to download the app but just ignore this for now. (You can't currently purchase eSIM through the app.) The goal here is to purchase the eSIM base. The eSIM costs 5 Euro but the purchase will give you a 7 Euro credit to use on any of the data plans.
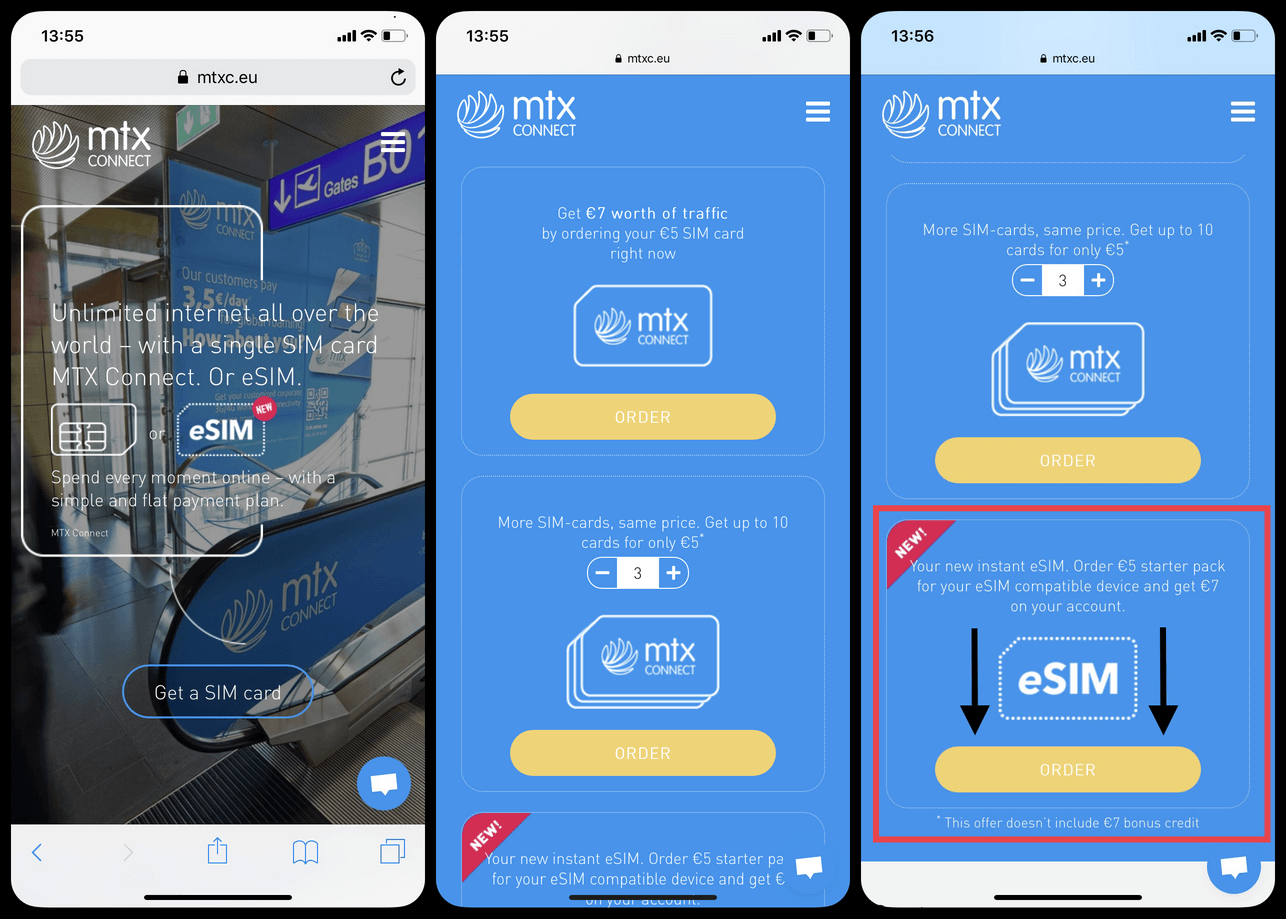
Scroll down the page until you arrive at the eSIM option and click Order. Once you do there will be a check box to verify whether or not your phone is eSIM capable. Just check this box, hit next, and go to the next screen.
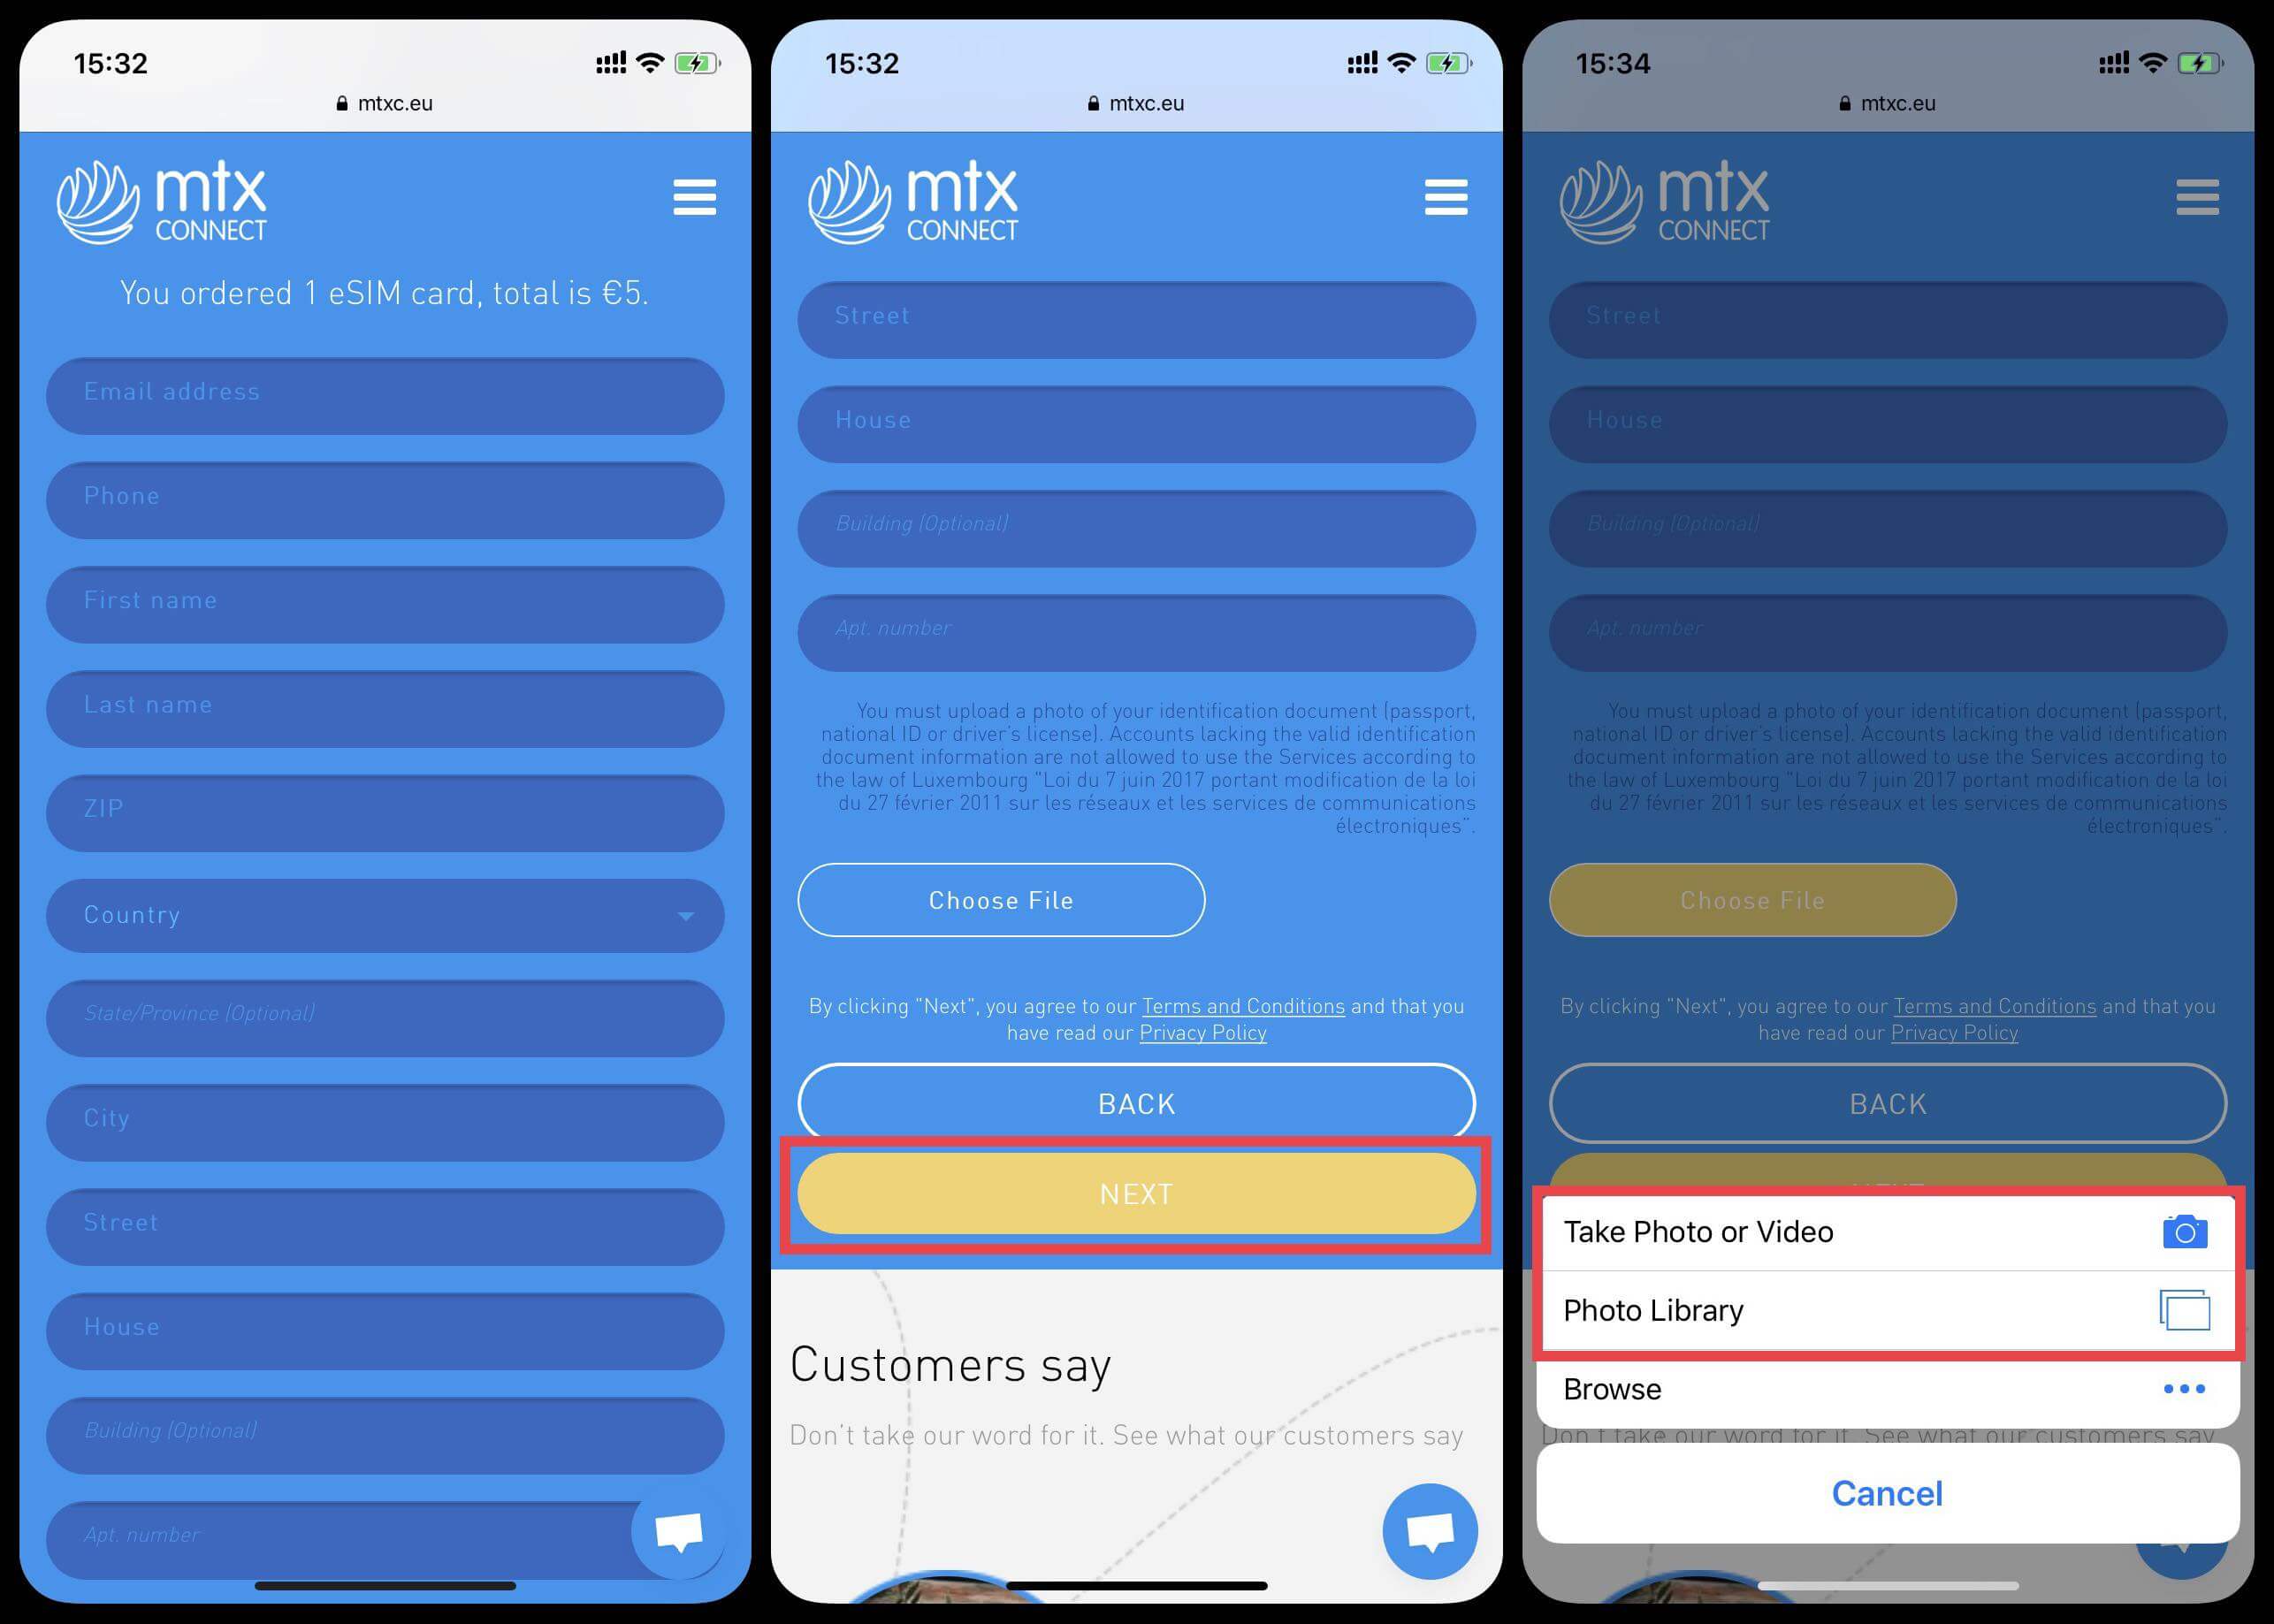
Although there is no physical product to ship you (being and eSIM and all), the website will still ask you to put in registration information including your address and phone number.
Also, as per Belgium law, the site requires you to upload a picture of an identification document (Passport, drivers license, etc.).
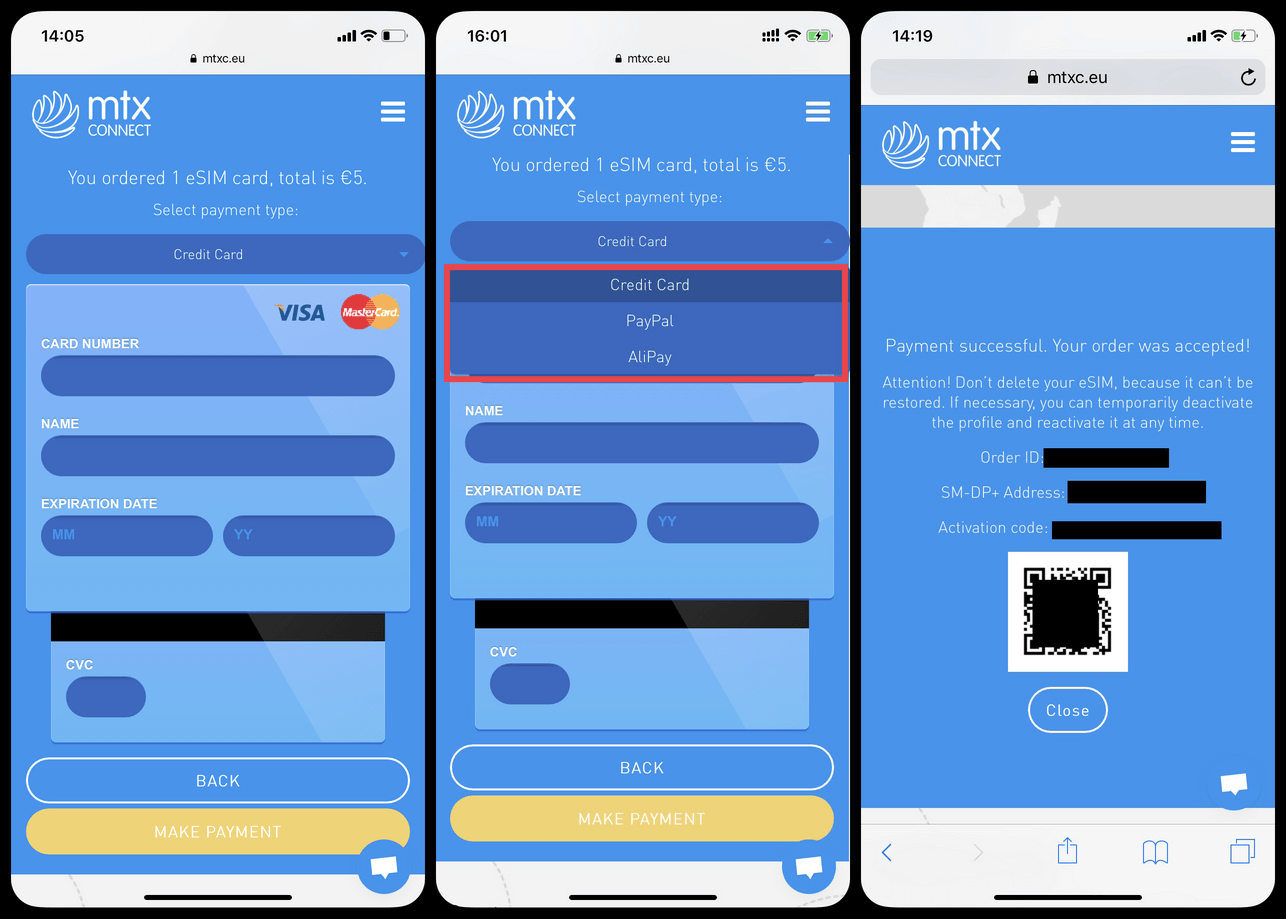
The next screen you need to input your payment information. There are 3 different payment options, credit card, PayPal, or AirPay. I went with the credit card option (they only accept MasterCard and VISA). Once you enter your credit card info, click "Make Payment". Once your payment of 5 Euros goes through, you'll be taken to the next screen containing your purchase information and QR code.
The info contained in this page is important! MTX Connect will also send you the order info in an email once the payment goes through. Along with the order info, there will be an email asking you to follow a link to confirm your email address. Go ahead and follow the link real quick because it's going to be important when purchasing the additional data for use with the eSIM later.
Congrats! You are one third of the way there! You just successfully purchased MTX Connect's eSIM! However, what you have now is just the eSIM that will only allow you to use some specific messaging apps (we'll get into this in a moment.) You also still need to set up the profile on your device before you can proceed any further, so let's get into that next step!
iPhone Settings for eSIM
Let's now go over how to get this profile (eSIM) up and running in your iPhone settings. All eSIMs, regardless of the company purchased from, will need to be activated using one of two methods. A QR code or with a company's mobile app.
Apple also has a great summary of how to do this on their website that I will link to down below. If you need a more in-depth guide check it out.
Setting up your cellular plan with eSIM | Apple
I'll also give you the abbreviated version of the guide down below (with pictures).
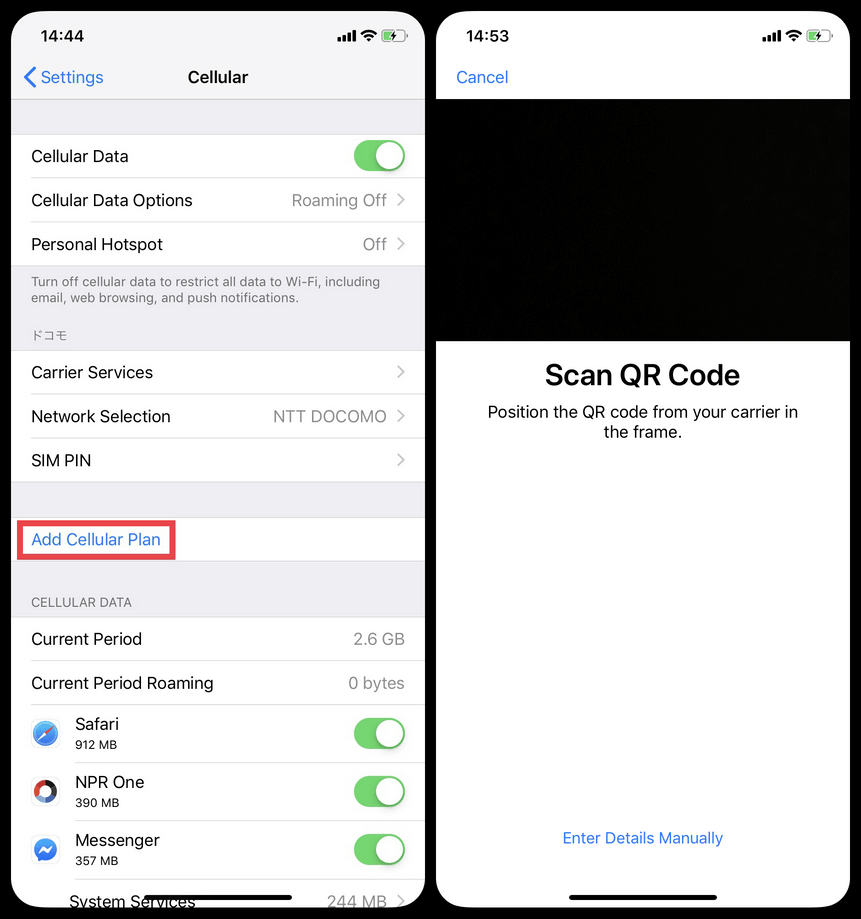
- Go into Settings > Cellular
- Click on "Add Cellular Plan"
- Scan a QR code (the QR code from the email)
(If you have the QR code open in the email on your computer or another phone, you can just go ahead and scan it right then and there. But if you're like me and you only have your iPhone with you, you will need to enter the details manually.)
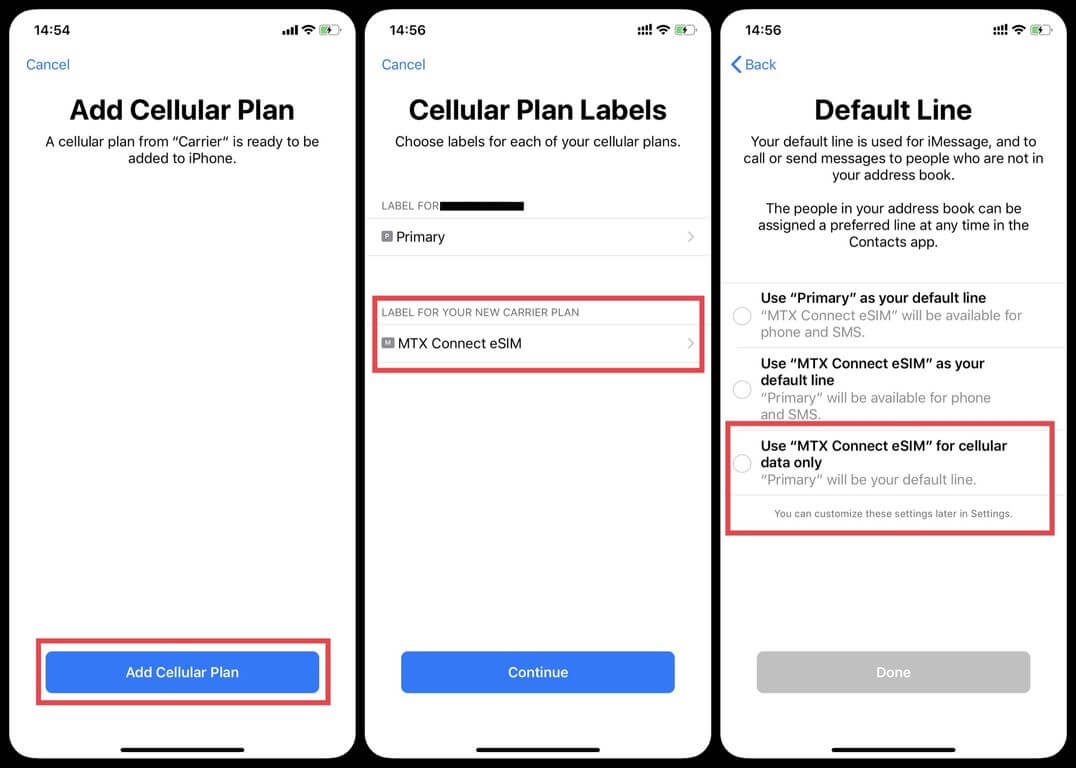
Once you've scanned the QR code, click the "Add Cellular Plan" blue button at the bottom of the screen and name your new carrier plan something if you want (I named it MTX Connect for differentiation purposes).
After you add the plan, you will be asked how you want this data line to be treated. These settings you can mess with all you like later. So for now, just choose the third one (use the eSIM for cellular data only).
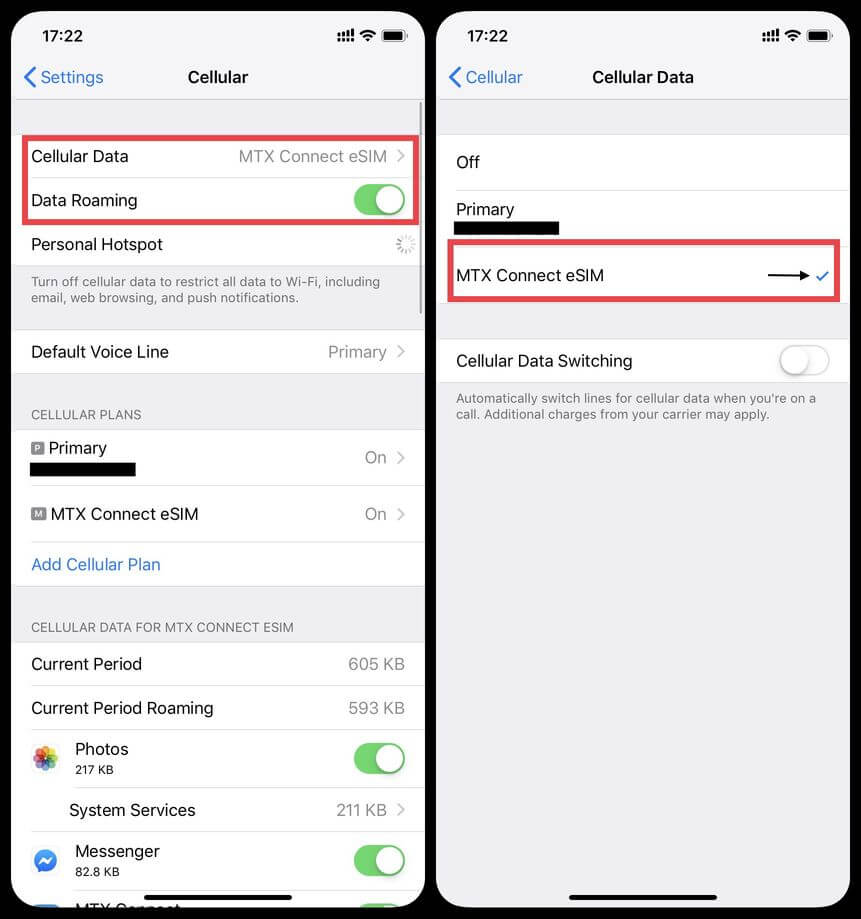
This next step is the most important. In order to use the eSIM network you have just activated you need to go into Settings > Cellular > Cellular Data, and make sure the little blue check appears next to whatever you named the eSIM from MTX Connect.
Also, and this cannot be stressed enough, make sure to turn your data roaming ON! Once you turn the roaming on, you should be able to see the network in your drop down control menu.
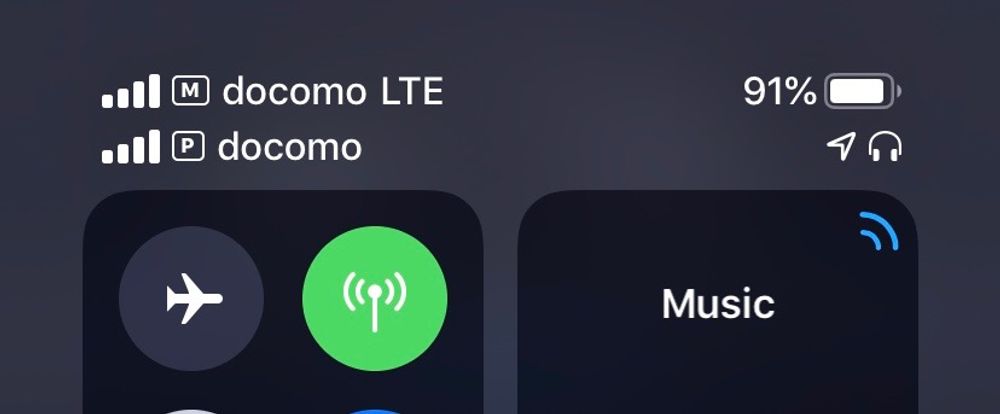
Assuming you've done everything correctly up to this point, the network your eSIM is using (one of the networks of whatever area/region you are currently in) should be showing as the first network on top in the upper left hand corner of the screen. In my case, I am based out of Japan so both my networks happen to say docomo. For you, if "docomo LTE" is showing on top, that means you have it set up correctly (for users in Japan).
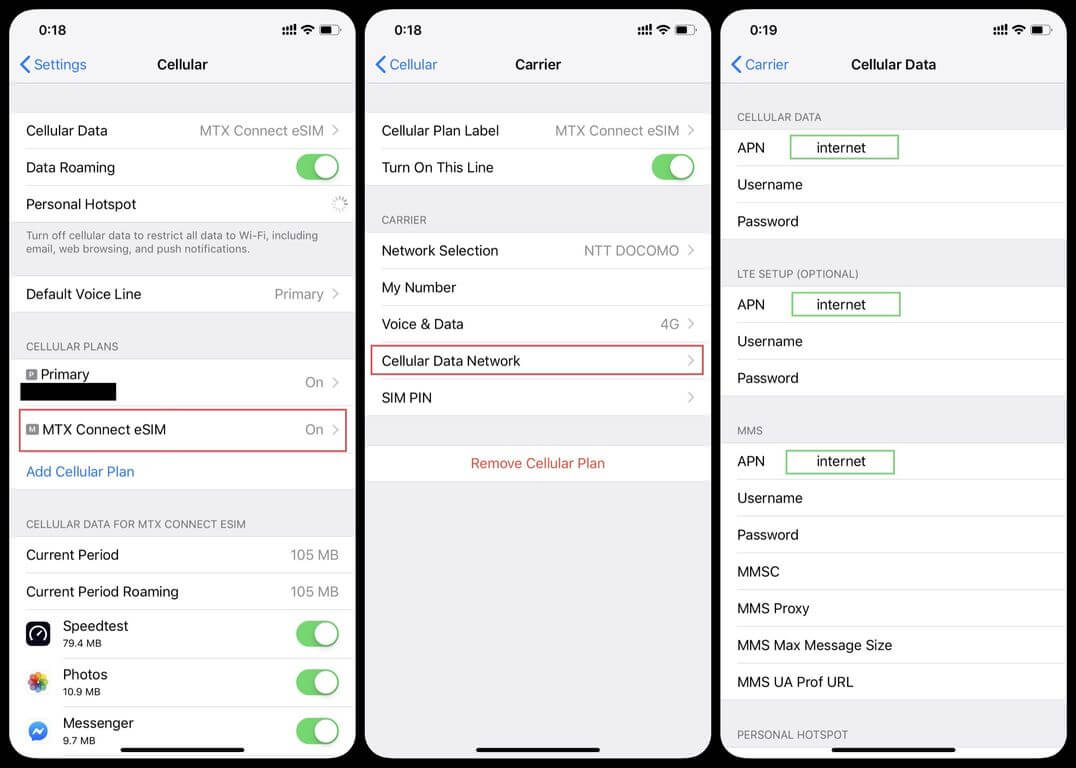
By this point you should have received an SMS message from MTX Connect telling you to turn your roaming data on and to fix your APN settings for the new network plan. Which brings us to our final step.
The last thing you need to do is adjust your APN settings. Go back into Settings > Cellular > Cellular Plans (MTX Connect) > Cellular Data Network. Here, you need to input in every APN space the word "internet". You can leave all the Username and Password information alone.
Perfect! Now that we have the eSIM profile loaded, just one more step to go!
Purchasing a data plan
Up to this point all you've done is purchased the eSIM itself (with no data plan). However, one cool thing about MTX Connect's eSIM is that it comes automatically enabled with a Free Chat plan as well as a 7 euro credit you can use towards any data plan.
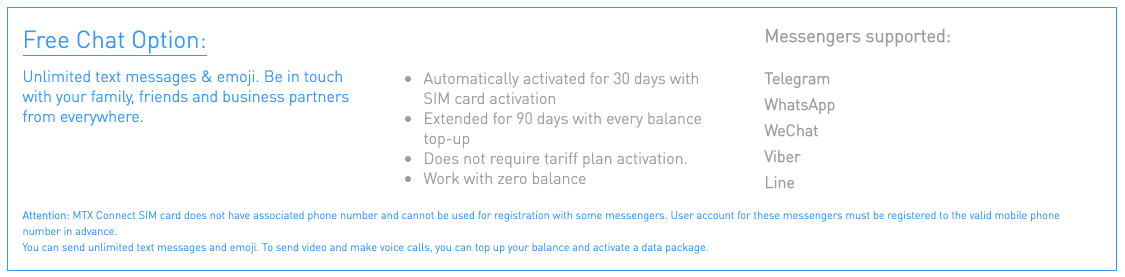
As soon as you added the new network (process shown above), this "Free Chat" plan was also activated. This package will allow you to use a couple of messaging apps specified by the company for free without purchasing any more data for 30 days. However, these messaging apps are limited to just a few selected by the company, but include a couple of big hitters like WhatsApp. If you charge up your balance in the account at any point the 30 day limit is automatically extended to 90 days. And the kicker is, you can still use the eSIM for messaging through the sanctioned apps even when you have no active data plan or zero Euro in your balance.
But if you want to do more than just use basic messaging apps, you will need an additional data plan. MTX Connect has a number of options for additional data plans.

- Optimal Daily: 350MB/24 hours (usable in over 80 countries)- €3,49
- Unlimited Daily: Unlimited/24 hours (usable in over 80 countries) - €9,99
- Big Data: In Europe 2GB, Besides Europe 1GB/15 days - €14,99
- Monster Data: In Europe 2GB, Besides Europe 1GB/15 days - €24,99
Aside from the pay as you go plan, there are 2 daily plans and two 15 day plans. You can check the country coverage page for yourself, but our research concluded that you can use the eSIM in over 80 countries. So most likely you will be covered!
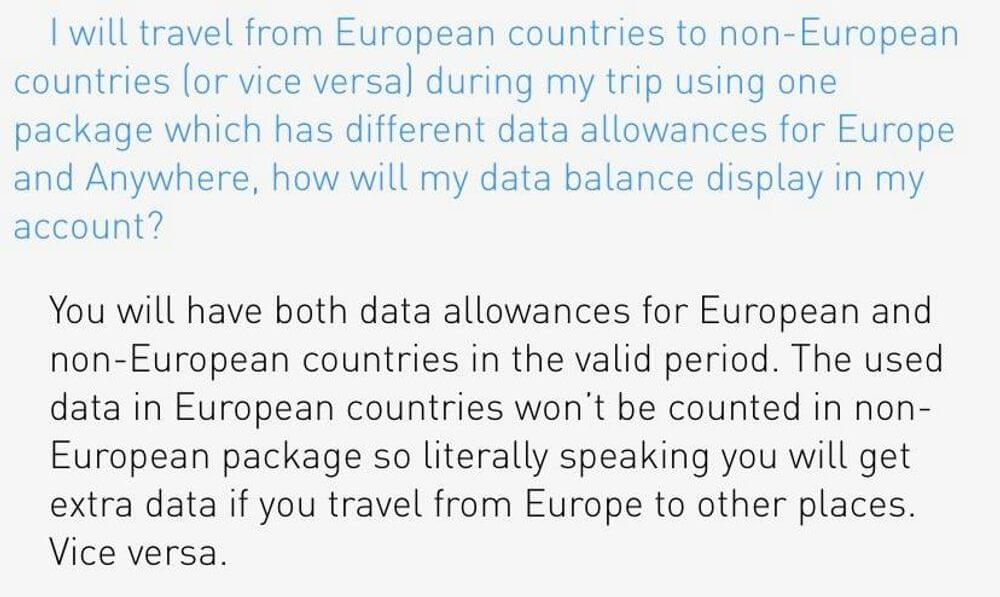
Also, according to the sites FAQ, the data limits for Europe and countries not part of Europe data limits are not mutually exclusive, meaning that technically if you go between countries while having this eSIM downloaded (while still within your time limit), you are able to use both data limits!
Next, in order to purchase a data plan, you are going to want to switch over to the app. Just download the MTX Connect app from the app store.
Note: Make sure your settings are set so that your phone is connected to the MTX Connect network. (As shown up above, remember to turn roaming on!) Do this before you click on the app. If you miss this step, you won't be able to directly log into the app without a password and will have to have a new password emailed to you.
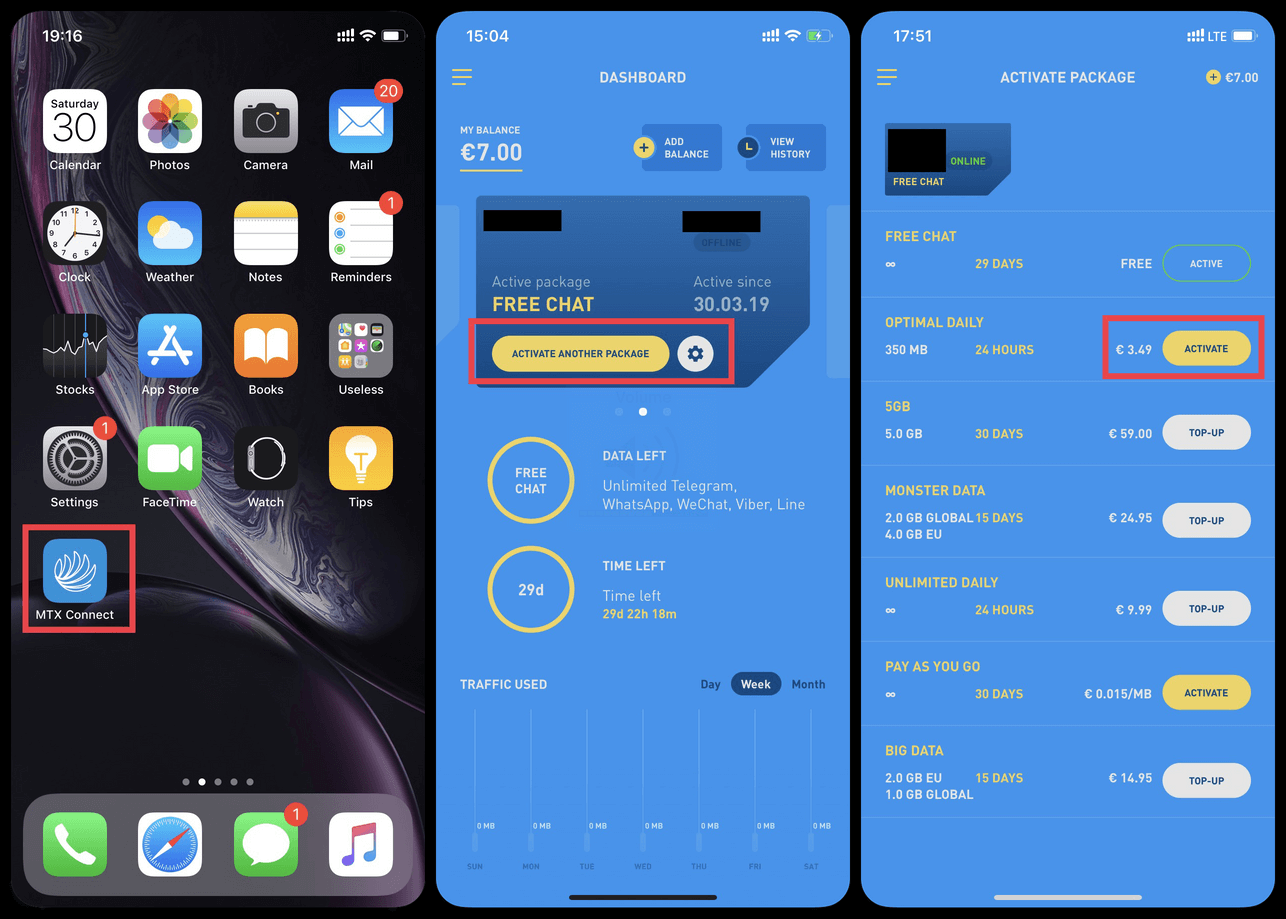
Once automatically signed into the app, a sleek looking blue dashboard should pop up. Click on "Activate Another Package" and then pick the plan you would like to download. (The 7 Euro credit you automatically get with your 5 Euro eSIM purchase will enable you to download the "Optimal Daily" package two times over.)
The "Optimal Daily" was the package I downloaded to test out but it only comes with 350 MB of data, but as shown above, there are 3 other data plans with larger data limit options available for those who may need more data.
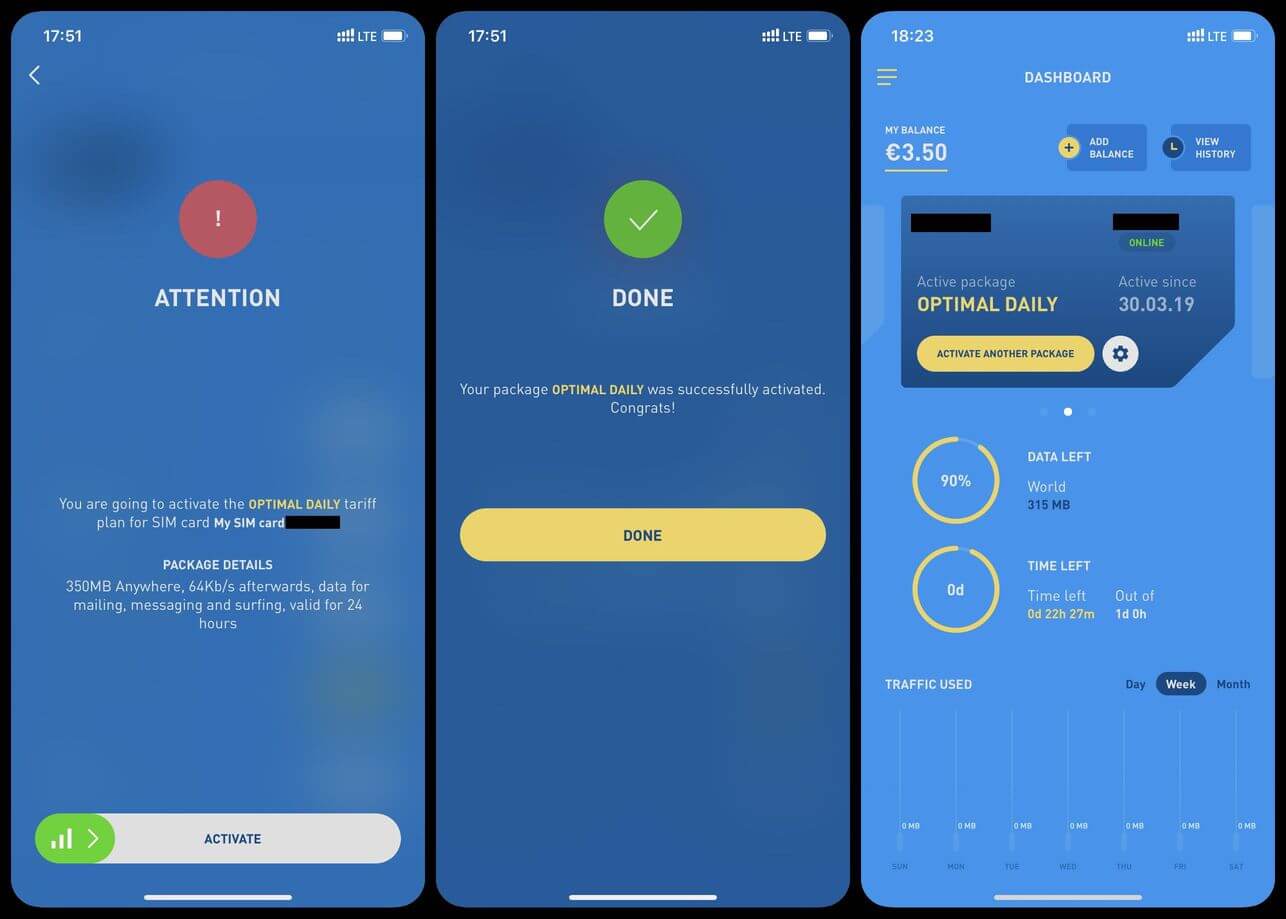
Once you activate the profile you should get a message telling you that it's been successfully activated. Back at the dashboard the name of the package you purchased should now be clearly denoted under "Active Package".
Great! Now that you've got your data plan activated, you are free to use your data!
Speed and use test
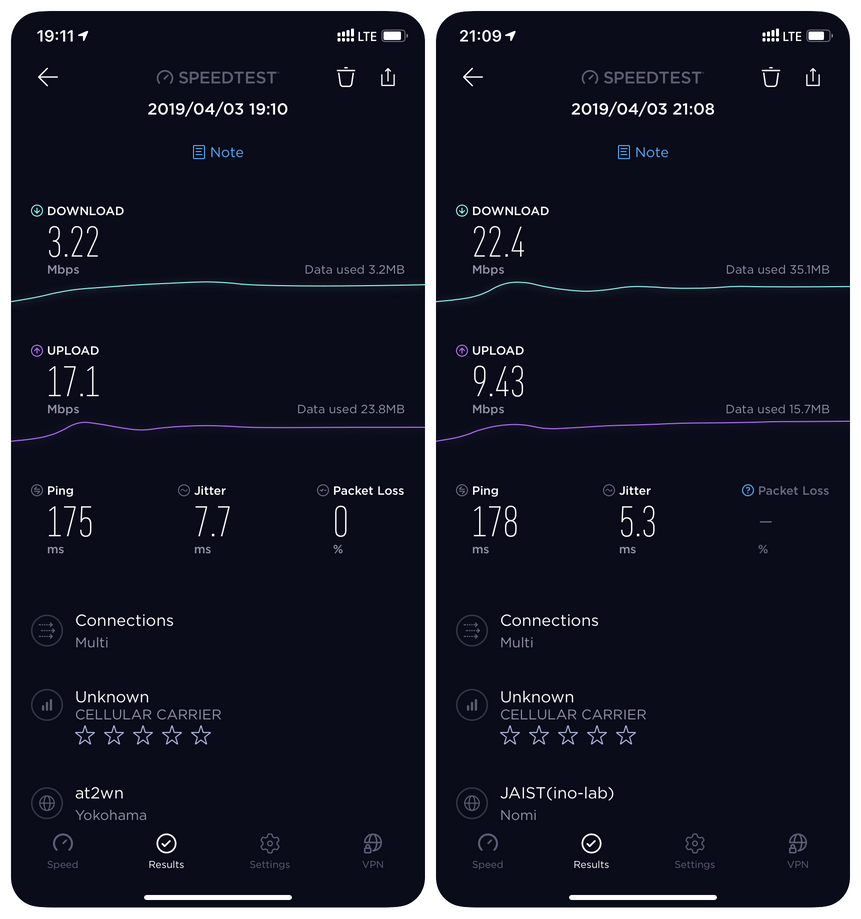
One of the main points of this blog, was to actually use and test the quality of the eSIM from MTX Connect so in order to facilitate this, I did a speed/quality test while using the network.
As you can see the results weren't too bad. However, I did experience some fluctuations in service, depending on the time of day. With a 3.22 Mbps download speed and a 17.1 Mbps upload speed for my first test, I was feeling somewhat uneasy. My second test though, had a much higher download speed clocking in at 22.4 Mbps.
All and all, regardless of the time of day, the speeds were enough to send the emails and also do some web surfing as well. The Ping and Jitter reads weren't too shabby either.
I was even able to use the personal hotspot function on the phone however, there is a need to make sure you have the APN settings adjusted correctly (as discussed above).
How MTX Connect's eSIM stacks up
From the purchasing process, all the way down to the actual use, let's bring things in with a quick summary of the pros and cons of the eSIM from MTX Connect.
Pros
- The mobile app was extremely responsive and very easy to use. (the auto-login was a nice touch)
- The "Free Chat" package that allows you to use messaging apps without needing any additional credit or previously purchased data.
- Being able to use the eSIM in over 80 different countries.
- Solid internet speeds that won't frustrate the user
Cons
- Having to upload a form of personal identification in order to make the purchase (Although, seeing as this is a Belgium law, it really can't be helped)
- Having to go in yourself and tweak the APN settings to get the network to operate correctly
- A lack of options for plans. No large data capacity or long term plans yet available for purchase.
- Still relatively costly for the amount of data your getting
- The increments at which they allow you to purchase more credits make it so the user is forced to purchase more than is necessary to but the plan. (a great business model for them, I might add)
And that's a wrap. Among all the eSIM options available at this point in time for travelers I was overall very impressed by MTX Connect's eSIM. It was relatively simple to set up and the apps sleek and intuitive interface made it really easy to use.
Furthermore, for those of you eSIM interested travelers out there. Here at eSIMDB, we provide a service that allows users to easily search and compare eSIM providers as well as their plans and rates. To anyone who may be interested in the exciting new world of eSIMs give our site a look!